

Generic Telescope Control System (TCS) Operations#
The same way groups of CSCs contains generic operations, a group of CSCs that is part of a Telescope Control System (TCS) group retain some common operations. For instance, a TCS will be responsible for slewing the telescope and tracking a target on the sky. The same way, a TCS will also be responsible for preparing the telescope for calibrations and on-sky operations.
To model these common TCS behavior the package implements BaseTCS.
This class itself is an abstract class and cannot be used stand-alone, but is fully implemented by ATCS and MTCS.
There are many advantages of this implementation as it minimizes code duplication and also provides users with a common interface and feature set, regardless of what telescope they are working with.
In terms of setting up and shutting down the system BaseTCS expands to add the following methods:
prepare_for_flatfield, to prepare the system for calibrations.
prepare_for_onsky, to prepare the system for on-sky operations.
shutdownto stow the system.
The actual operation performed by each of those tasks is particular to the final implementation and is detailed in Auxiliary Telescope Control System (ATCS) and Main Telescope Control System (MTCS).
Furthermore, the TCS provides a suit of useful slew operations. The examples below are equally valid for the Main and Auxiliary telescopes. One would simply do:
from lsst.ts.observatory.control.auxtel import ATCS

tcs = ATCS()
to operate the Auxiliary Telescope or;
from lsst.ts.observatory.control.maintel import MTCS

tcs = MTCS()
for the Main Telescope.
Coordinate Transformation Facility#
The BaseTCS class provides utilities to transform RA/Dec coordinates to Azimuth/Elevation and vice-versa.
These are mainly available through the methods radec_from_azel and azel_from_radec.
The following will compute the coordinates at the current observatory time.
az = 45.
el = 75.

radec_icrs = tcs.radec_from_azel(az=az, el=el)

ra = 5.
dec = -40.

azel = tcs.azel_from_radec(ra=ra, dec=dec)
It is also possible to provide a time for which the observation is intended to compute the coordinate.
from lsst.ts import salobj
from lsst.ts import utils

# Compute coordinates 2 minutes (120 seconds) from now.

obs_time = utils.astropy_time_from_tai_unix(utils.current_tai() + 120)

az = 45.
el = 75.

radec_icrs = tcs.radec_from_azel(az=az, el=el, time=obs_time)

ra = 5.
dec = -40.

azel = tcs.azel_from_radec(ra=ra, dec=dec, time=obs_time)
Furthermore, it is also possible to estimate the parallactic angle of an Ra/Dec coordinate for the current time or by providing a time of the observation:
# Parallactic angle at runtime.
pa = tcs.parallactic_angle(az=az, el=el)

# Parallactic angle at a given time.
pa = tcs.parallactic_angle(az=az, el=el, time=obs_time)
Slewing To Fixed Positions#
To slew the telescope to an AzEl coordinate (for instance, to conduct some maintenance or calibrations), it is possible to use point_azel.
The method will slew to a fixed position in the local coordinate and will not initiate tracking.
For instance, to slew the telescope to azimuth=0 and elevation=80 degrees;
await tcs.point_azel(az = 0, el=80)
By default the method will set the rotator physical angle to zero, thought it is also possible to set a desired angle as well (also in degrees). In additional, it is also possible to set a name for the position.
await tcs.point_azel(az = 0, el=20, rot_tel=90, target_name="maintenance xyz")
The rotator position above (rot_tel) is the rotator physical coordinate.
Slewing And Tracking#
It is possible to slew to an ICRS coordinate using slew_icrs.
It assumes ra is in hours and dec in degrees but it also accepts values in astropy.units and astropy.Angle.
For instance, all the commands below slew to the same target.
It is recommended, but not required, to set the target name.
#  coordinate in sexagesimal, separated by ":"
#  bare-minimum command set
await tcs.slew_icrs(ra="20:00:00.0", dec="-80:00:00.00")

#  coordinate in sexagesimal, separated by space
#  and setting object name
await tcs.slew_icrs(
          ra="20 00 00.0", dec="-80 00 00.00", target_name="Test target"
      )

#  coordinate in sexagesimal, separated by ":" in ra and space in dec
await tcs.slew_icrs(
          ra="20:00:00.0", dec="-80 00 00.00", target_name="Test target"
      )

#  coordinate in float
await tcs.slew_icrs(
          ra=20.0, dec=-80.0, target_name="Test target"
      )

# coordinate as astropy.units, passing RA in degrees
from astropy import units as u

await tcs.slew_icrs(
          ra=300.0 * u.deg, dec=-80.0, target_name="Test target"
      )

# coordinate as astropy.Angle
from astropy.coordinates import Angle

await tcs.slew_icrs(
    ra=Angle(20, unit=u.hourangle),
    dec=Angle(-80, unit=u.deg),
    target_name="Test target"
)

# coordinate as astropy.Angle, passing RA in degrees
from astropy.coordinates import Angle

await tcs.slew_icrs(
    ra=Angle(300, unit=u.deg),
    dec=Angle(-80, unit=u.deg),
    target_name="Test target"
)
It is also possible to slew to a target by name using slew_object, as long as it can be resolved via Simbad.
The method is similar to slew_icrs, but receives the target name instead of the coordinates.
await tcs.slew_object("M31")
Rotator Position And Sky Position Angle#
It is important to highlight that all commands above assume “position angle” equal to zero. Position angle is defined as the angle measured going from North, increasing in the direction of right-ascension (Eastwards).
The appearance of a field in a CCD image will highly depend on how the instrument is oriented with respect to the field-of-view.
In general, instruments are aligned such that, when position angle is zero, the CCD x-axis is alined with East-West and y-axis is alined with South-North (See fig-position-angle).
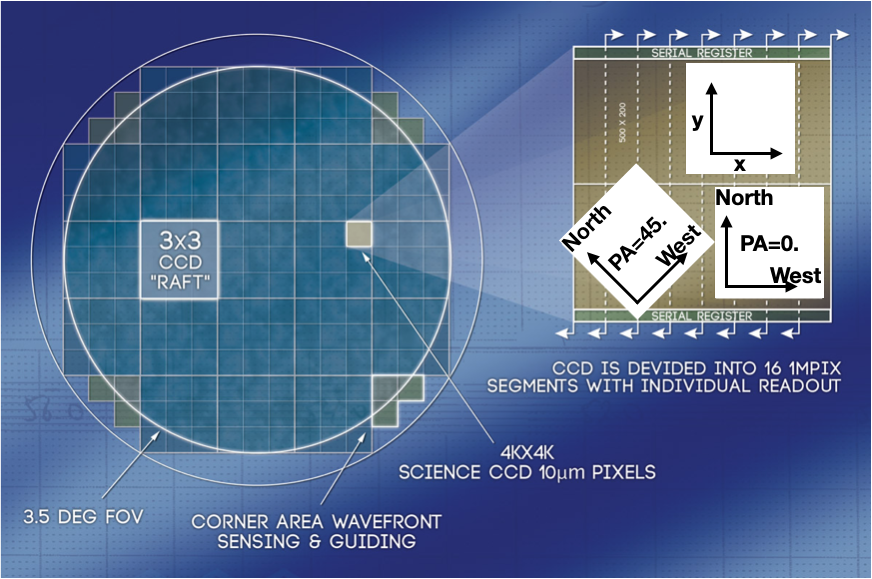
Illustration of the definition of position angle.#
It is common practice to assume a CCD x-axis as the readout (or serial-shift) direction and y-axis the parallel-shift direction. The direction of the readout is, in general, assumed to be the direction of the axis, e.g.; if the serial read is done left-to-right, the x-axis increases from left-to-right . With the advent of multiple-readout sections CCDs, defining the direction of the axis can be tricky. Again, the general approach is to assume that the upper part of the CCD serial and parallel readout happens in the positive x and y-directions, respectively.
As can be seen in fig-position-angle, if the position angle changes (e.g. PA=45) the field will be rotated in the image.
Position angle is an often overlooked parameter when slewing to a target but it is also fundamental in determining the rotator/instrument orientation.
Users can specify the position angle for the observation as well as use a couple different strategies for dealing with the rotator/instrument position.
This is controlled using a pair of parameters; rot and rot_type, which allows the user to specify the desired value (in degrees) and rotator strategy, respectively.
The available strategies (and their meaning) are listed in RotType.
By default rot_type = RotType.SkyAuto, which means rot is treated as “position angle” and that it can be adjusted to be in range, if necessary.
Because telescope rotators have limited range (e.g. +/- 90 degrees for the main telescope) a certain position angle may be unreachable for a target.
In this case, the adjustment consists of adding 180 degrees to the specified position angle; which usually, but not always, result in a rotation angle that is in range.
As with ra and dec, rot can be specified as a float (assumed to be in degrees), as a sexagesimal string (separated by colon or space, also assumed to be in degrees), using astropy unit module or astropy Angle object.
import astropy.units as u
from astropy.coordinates import Angle

# Select position angle = 0. degrees, this is the default set and will
# cause the North axis to be aligned with the y-axis of the image with East
# in the negative direction of x-axis, e.g. North-up East-left
# orientation.
await tcs.slew_icrs(
          ra="20 00 00.0", dec="-80 00 00.00", rot=0, target_name="Test target"
  )

# Select position angle = 90 degrees, this will cause the North axis to be
# along the x-axis of the image and East will be pointing in the y-axis
# direction, e.g. North-right East-up
await tcs.slew_icrs(
          ra="20 00 00.0", dec="-80 00 00.00", rot=90, target_name="Test target"
      )

# Select position angle = 90 degrees, passing as sexagesimal string with :
await tcs.slew_icrs(
          ra="20 00 00.0", dec="-80 00 00.00", rot="90:00:00", target_name="Test target"
      )

# Select position angle = 90 degrees, passing as sexagesimal string with spaces
await tcs.slew_icrs(
          ra="20 00 00.0", dec="-80 00 00.00", rot="90 00 00", target_name="Test target"
      )

# Select position angle = 90 degrees, using astropy units
await tcs.slew_icrs(
          ra="20 00 00.0", dec="-80 00 00.00", rot=90*u.deg, target_name="Test target"
      )

# Select position angle = 90 degrees, Using astropy Angle
await tcs.slew_icrs(
          ra="20 00 00.0", dec="-80 00 00.00", rot=Angle(90, unit=u.deg), target_name="Test target"
      )
If you rather have the method not try to find a suitable angle in case the specified value is unreachable, specify rot_type=RotType.Sky.
await tcs.slew_icrs(
          ra="20 00 00.0",
          dec="-80 00 00.00",
          rot=0,
          rot_type=RotType.Sky,
          target_name="Test target"
  )
Users also have the option to select a physical angle for the rotator.
For instance, if you are trying to keep the Rotator close to a particular physical range (due to some hardware limitation or observational strategy) and still want the rotator to track the sky, use rot_type=RotType.PhysicalSky instead;
# Use PhysicalSky rotator strategy with rot=20. This will cause the rotator
# to start tracking at the rotator physical orientation of 20. degrees but
# still track the sky.
from lsst.ts.observatory.control.utils import RotType

await tcs.slew_icrs(
          ra="20:00:00.0",
          dec="-80 00 00.00",
          rot=20,
          rot_type=RotType.PhysicalSky,
          target_name="Test target"
      )
This will cause the rotator to be positioned close to the physical (e.g. encoder) angle of 20. degrees.
Note that this angle is defined at the start of the slew, and the telescope will resume tracking normally, so the rotator will be moving to de-rotate the field.
If instead, you need the rotator to remain fixed at a set position but the telescope must track (e.g. for filter changes on the main telescope), use the rot_type=RotType.Physical option.
# Use of Physical rotator strategy with rot=0 This will cause the
# rotator to move to 0 degrees and not track.
# WARNING: The telescope will track the alt/az axis but the rotator will
# be kept fixed in physical position 0. degrees.
await tcs.slew_icrs(
          ra="20:00:00.0",
          dec="-80 00 00.00",
          rot=0,
          rot_type=RotType.Physical,
          target_name="Test target"
      )
Warning
When using rot_type=RotType.Physical the rotator will remain fixed and will NOT track the sky rotation.
Long exposures taken while tracking with this strategy will show field rotation.
When conducting spectroscopy (e.g. with the Auxiliary Telescope) it is useful to be able to position the field in terms of the parallactic angle.
For that, one can use the rot_type=RotType.Parallactic parameter;
await tcs.slew_icrs(
          ra=20.0,
          dec=-80.0,
          rot=0,
          rot_type=RotType.Parallactic,
          target_name="Test target"
      )
Although the default rot=0 is the most commonly used value when using rot_type=RotType.Parallactic, the user is free to select any angle.
In case the user demands an angle outside the valid range, the task will fail and raise an exception and not slew to the demanded position.
>>> await tcs.slew_icrs(...)
---------------------------------------------------------------------------
AckError                                  Traceback (most recent call last)
<ipython-input-25-be270f3a125b> in async-def-wrapper()
.
.
.
AckError: msg='Command failed', ackcmd=(ackcmd private_seqNum=1597989109,
ack=<SalRetCode.CMD_FAILED: -302>, error=6611,
result='Rejected : rotator position angle out of range')
The error message will show the exception traceback, which can be somewhat intimidating. However, the important bit of information can be found in the last couple lines of the output (as shown above). This is also valid in case the user tries to slew to any other unreachable position (e.g. zenith blind spot, low elevation, etc.). In this case, the error message will vary accordingly.
The same rotator options are available when using slew_object.
await tcs.slew_object("M31", rot=45.)

await tcs.slew_object("M31", rot=20, rot_type=RotType.PhysicalSky)

await tcs.slew_object("M31", rot=0, rot_type=RotType.Physical)

await tcs.slew_object("M31", rot=0, rot_type=RotType.Parallactic)
Offsetting#
The pointing component (and thus the BaseTCS class) support several different offset options.
In terms of coordinate frames the following options are available:
offset_azelOffset telescope in azimuth and elevation.
offset_xyOffset telescope in terms of boresight. This will cause the field to move in x and y.
offset_radecOffset telescope in RA and Dec. Perform arc-length offset in sky coordinates. The magnitude of the offset is \(\sqrt{ra^2 + dec^2}\) and the angle is the usual \(atan2(dec, ra)\).
The main distinction between the methods above is the coordinate frame they operate with.
Except for offset_xy the resulting image offset will heavily depend on the position on the sky and the rotator configuration.
Therefore, when trying to position a target in a particular place of the FoV, it is highly recommended to use this method.
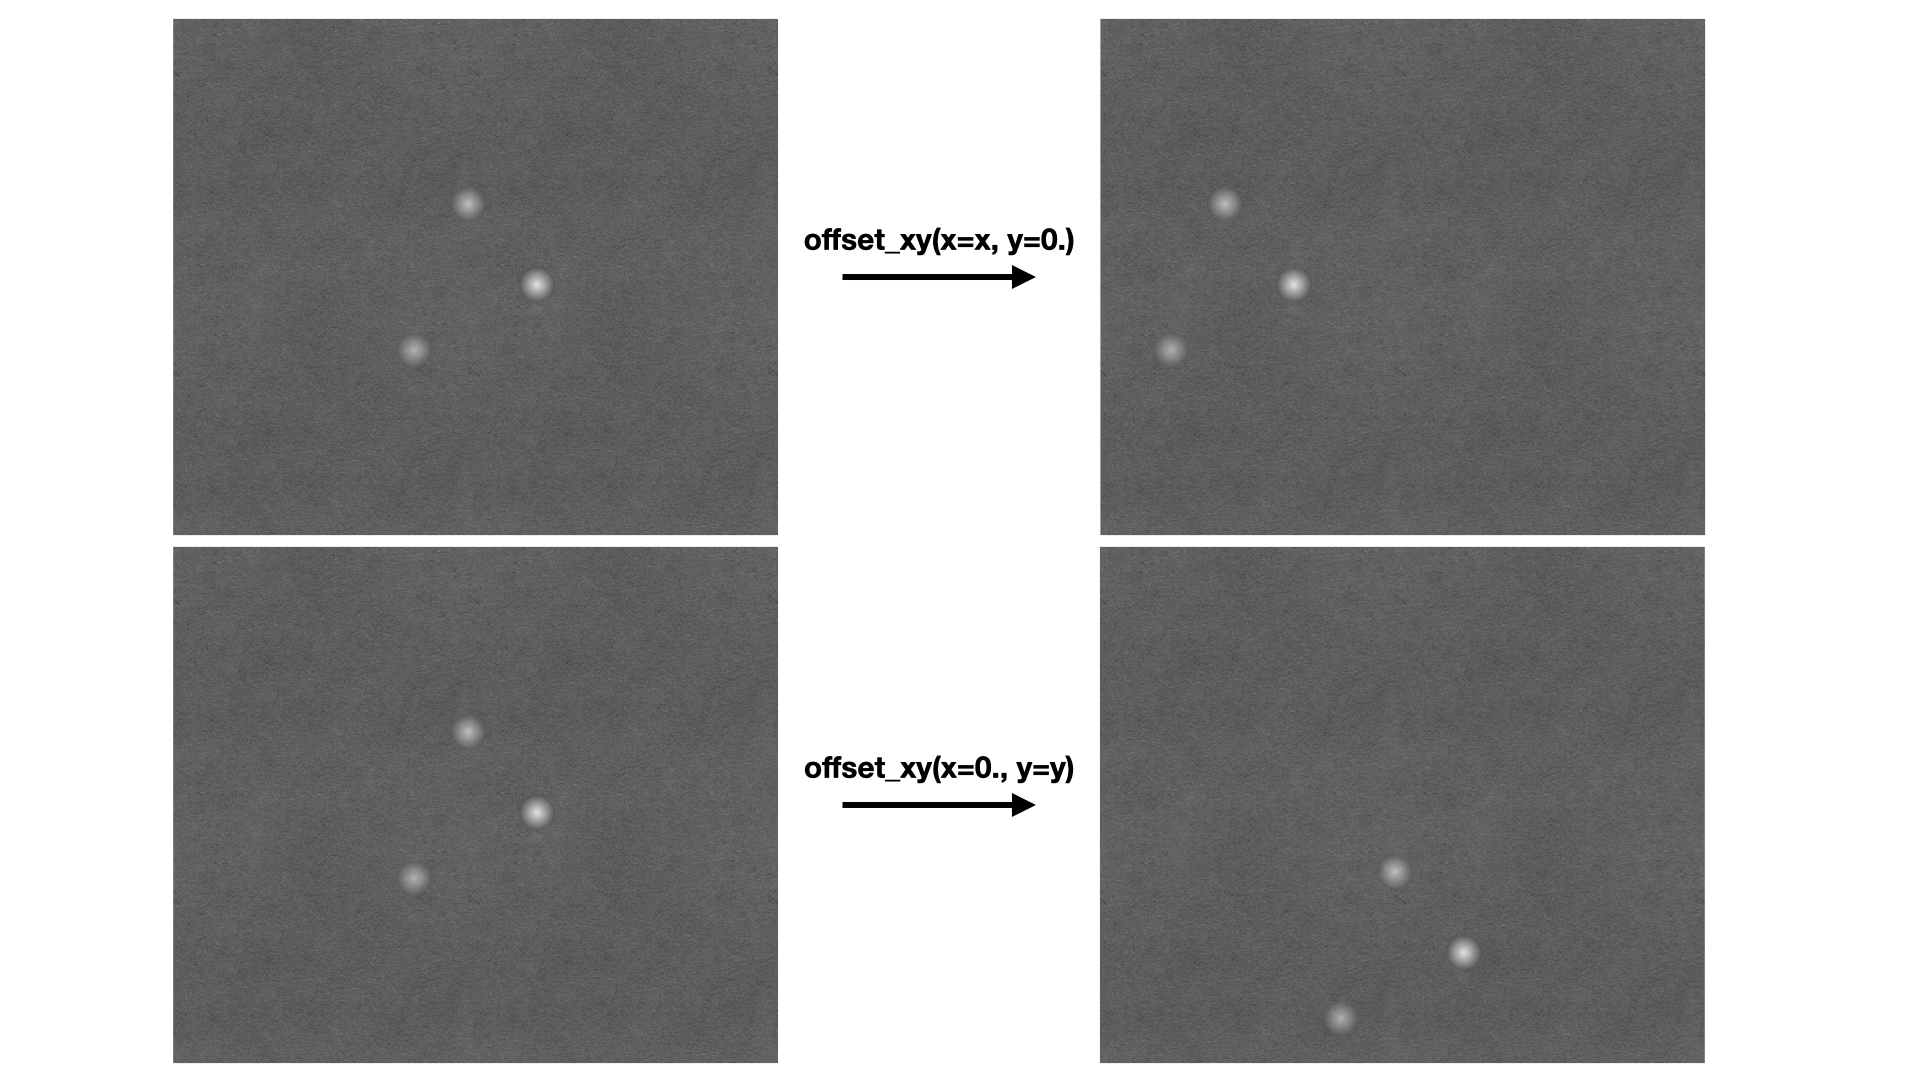
The offset_xy method is designed to perform offset in image coordinates.
For instance;
await tcs.offset_xy(x=10., y=0.)
Will result in a 10. arcseconds offset of the telescope in the positive x direction, resulting in an image offset in the negative direction.
The definition of x and y axis can be found in Rotator Position And Sky Position Angle section, also see fig-position-angle.
In fig-offset-xy-example we show an example of the result of using offset_xy.
In addition to the different methods shown above, users also have control of how the offsets are treated by the pointing component. For each command, there are two additional control flags the user can rely on to change the underlying behavior.
Relative vs Non-Relative Offsets#
Warning
This section refers specifically to relative and non-relative offsets.
By default these offsets are not absorbed by the system and will be overwritten by a slew operation. For more information about absorbing offsets see Persistent vs Non-Persistent Offsets.
Keep in mind that these two features (relative and persistent) are orthogonal and their behavior can be combined.
This option is controlled by the relative input parameter of the offset methods.
By default offsets are relative to the current telescope position, e.g.; relative=True.
Basically, these offsets will accumulate with one another, e.g.;
await tcs.offset_azel(az=10, el=0)
await tcs.offset_azel(az=0, el=10)
Will result in an offset of 10 arcsec in azimuth (from the first command) and elevation (from the second). Relative offsets are probably the most common and general kind of offsets used and are employed on most use cases.
Non-relative offsets are performed with respect to the pointing origin. For instance, the following sequence of commands;
await tcs.offset_azel(az=10, el=0, relative=False)
await tcs.offset_azel(az=0, el=10, relative=False)
Is equivalent to a 10 arcsec offset in elevation only and is equivalent to performing the second command alone, e.g.;
await tcs.offset_azel(az=0, el=10, relative=False)
Non-relative offsets are useful when performing operations that may use the original position as a reference.
For instance, when building grids of observations one may want to use non-relative offsets.
The following command sequence will perform a square grid on the sky (see fig-offset-azel-grid);
grid_az = [-10, +10, +10, -10]
grid_el = [-10, -10, +10, +10]
for az,el in zip(grid_az, grid_el):
  await tcs.offset_azel(az=az, el=el, relative=False)
  # Do something here
  ....

# Restore the original telescope position.
await tcs.offset_azel(az=0., el=0., relative=False)
The same pattern using a relative offset would look like this:
grid_az = [-10, 0, 20, 0]
grid_el = [-10, +20, 0, -20]
for az,el in zip(grid_az, grid_el):
  await tcs.offset_azel(az=az, el=el)
  # Do something here
  ....

# Restore the original telescope position.
await tcs.offset_azel(az=10., el=-10.)
As you can see, not only defining the grid is easier using non-relative offsets but also, if an error occur during the for loop, it is considerably simpler to restore the telescope to its original position.
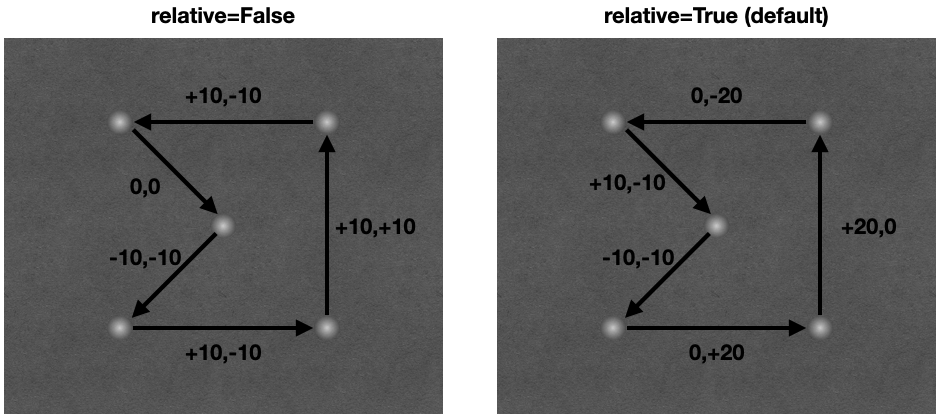
Same offset pattern executed with non-relative (left hand side) and relative (right hand side) offsets. The numbers on the images represent the input to the offset command on both scenarios.#
Relative and non-relative offsets can also be combined. For instance, the following sequence of commands;
await tcs.offset_azel(az=10, el=0, relative=True)
await tcs.offset_azel(az=0, el=10, relative=True)
await tcs.offset_azel(az=0, el=10, relative=False)
You will result in a 10 arcsec offset in azimuth and 20 arcsec in elevation; 10 arcsec from the relative offset and 10 from the non-relative offset.
Combining relative and non-relative offsets can be useful if one wants to execute a pattern as shown above but want to do it with an offset with respect to the original position. For instance;
grid_az = [-10, +10, +10, -10]
grid_el = [-10, -10, +10, +10]

# offset telescope in elevation
await tcs.offset_azel(az=0, el=10)

# The pattern here will be entirely offset by 10 arcsec in elevation due to
# the command above.
for az,el in zip(grid_az, grid_el):
  await tcs.offset_azel(az=az, el=el, relative=False)
  # Do something here
  ....

# Restore the original telescope position.
# Relative offset will still be in effect.
await tcs.offset_azel(az=0., el=0., relative=False)

# Also remove the relative offset
await tcs.offset_azel(az=0, el=-10)
In all cases above, the offset will be overwritten if a new target is sent, e.g.;
await tcs.offset_azel(az=10, el=0, relative=True)
await tcs.offset_azel(az=0, el=10, relative=True)
await tcs.offset_azel(az=0, el=10, relative=False)
await tcs.slew_object("HD 164461")  # reset all offsets above
Will result in a slew with no offsets.
Absorbing Offsets#
It is possible to control whether offsets will be absorbed by the system and persist between slew commands using the absorb flag.
By default offsets are not absorbed by the system, e.g., absorb=False.
Absorbing offsets is useful when there are offsets that need to propagate through different slews.
For instance, the LATISS instrument in the Auxiliary Telescope contains a set of filters and gratings that will offset the images projected into the detector. In this situation we require the offset to be applied based on the instrument configuration, and this offset must persist through different slews.
Furthermore, the relative flag also applies to absorb offsets.
For example, the sequence of command below;
await tcs.offset_azel(az=10, el=0, relative=True, absorb=True)
await tcs.offset_azel(az=0, el=10, relative=True, absorb=True)
await tcs.offset_azel(az=0, el=10, absorb=True)
await tcs.slew_object("HD 164461")
Will result in a slew offset by 10 arcsec in azimuth and 20 arcsec in elevation.
Persistent vs Non-Persistent Offsets#
Warning
Use of persistent flag is deprecated, use absorb instead.
Resetting Offsets#
In order to reset offsets, users can rely on the reset_offsets method.
await tcs.reset_offsets()
By default, the method will reset all offsets.
Users can control whether to reset only offsets that where absorbed or not using the absorbed and non_absorbed flags.
Both the relative and non-relative offsets are always reseted for the selected option.
For example, the commands below show how to reset only the absorbed and not absorbed offsets, respectively.
await tcs.reset_offsets(absorbed=True, non_absorbed=False)  # reset only absorbed offsets
await tcs.reset_offsets(absorbed=False, non_absorbed=True)  # reset only offsets that where not absorbed
Synchronization Between TCS and Camera#
One common issue when operating with a TCS class and a Camera class is that we need to be able to synchronize their operations in order to reliably take data.
This synchronization is handled using ready_to_take_data in BaseTCS.
To use this feature the user must simply pass this method to the BaseCamera class constructor, which then allows it to wait for the TCS to be ready to take data.
The synchronization is only used by take_object method.
The procedure, using the Auxiliary Telescope classes as an example, is as follows:
from lsst.ts import salobj
from lsst.ts.observatory.control.auxtel import ATCS, LATISS

domain = salobj.Domain()

atcs = ATCS(domain)
latiss = LATISS(domain, tcs_ready_to_take_data=atcs.ready_to_take_data)

# If we now use take_object to select the instrument configuration, the
# method will also wait for the atcs to finish synchronizing (ATAOS apply
# any telescope and focus correction)
await latiss.take_object(10., n=3, filter=2, grating=3)